Tabs

Tuesday, November 30, 2010

Day 8 & 9

Day 8- My favorite Quote

A lot of my favorite "quotes" are Bible verses, just because they give me so much hope. but one that is not a Bible verse is

It is not length of life, but depth of life.

--------Ralph Waldo Emerson

I love this quote, because it kind of makes me remember that life is fragile and sometimes short, so we need to make the best of everything. Even though my mom's life was shorter than most, she definately had more depth than people who live to be 100.


Day 9- My dream house
If the market EVER goes back up, Gabe and my dream is to buy an old farm house on acreage and fix up the farm house! Here is a picture that is similar to my dream.
Something like this that is cute, with a big porch and big trees! Gabe grew up on a farm, so he loves to be out in the middle of nowhere. I kind of like being around people, but this wouldn't be so bad. The house doesn't need to be huge, just enough room for everyone to live comfortable and enough room for my crafts! :)


SECOND Linky Party

Last time I tried to do a link party I only had about 30 followers. Now that I have more followers that means more great ideas and crafts that people should share!

Rules:
1. Become a Follower if you would like to
2. Share to your direct post, not your home page
3. Grab my button and put it somewhere on your blog so others can join!

I will be featuring a few of my favorite projects, so link as many projects as you want!


Photobucket


Scarf with Pockets

I am sorry I haven't been posting a lot lately! I had my husband home from work for 10 days due to a surgery and then thanksgiving, so I haven't had as much time as usual! Here is a scarf I saw on Delia Creates. Hers is much longer, but I was in a hurry and didn't read her directions very well. It is a fun easy scarf that would make great gifts!

Sorry for the horrible photos, but I think it is enough to get the idea! I hurried and finished this before work because I was worried about not posting very much, I didn't want to lose anybody.

Monday, November 29, 2010

Day 7

Day 7 is a picture with the person I have been closest with the longest


This is me and my best friend Courtnee! Courtnee and I have been friends since the third grade. She claims that elementary and Jr. High was rough to be friends with me because I was grounded most of the time... which is true.  This was taken on our trip to California to go to the price is right! This is an old picture because Courtnee and her husband have been in South Korea for a year and half teaching english. They come home in 19 days! So excited! Courtnee and I have had lots of fun times together and have gotten into LOTS of trouble together! She was my maid of honor at my wedding, and forgot my husband's ring! It was pretty hilarious, and I didn't care, but she is still horrified about that even today!
I was in Courtnee's wedding too, but luckily didn't have any responsibilites of forgetting the ring! This is at her wedding, and Thomas was only 2 weeks old. Courtnee is my longest friend and I am sure will be for life!

Sunday, November 28, 2010

Day 6

Day 6 is my favorite book.

I am going to have to go with the whole Harry Potter series. If you think I am a nerd, you obviously haven't read them! They are EXCELLENT! I even finally got my husband to read one of them, and he is addicted as well. These are such great books you can just read them over and over again.

Christmas Wreath

This is a project I learned from my mom when I was about 8 years old! We did one of these for Christmas, and I still have it! So, I thought I would make another one since they are so easy and cute.
Supplies Needed:
  1. Criss Cross Scissors ( I think they are officially called pinking sheers)
  2. 5 Coordinating fabrics, 1/8 of a yard each
  3. A pen
  4. And a foam circle

First, Cut all of your fabric so that each edge has a criss cross on each edge. Then cut small squares.

Next take your Square and put it on top of the wreath. With the pen, push it down so that the center is stuck into the foam.


Continue sticking the fabric in close together so that none of the foam shows

Then, You are done!

A cute little wreath to hang on the door or wall.

Saturday, November 27, 2010

Day 5

Day 5 is my favorite Television program... I will give you one reality, and one sitcom!

Reality- America's Next Top Model. Yes. I will admit this show is ridiculous, but SO addicting. I am 4'11" so it is fun to watch all the tall girls do their thing, and fight with each other.

Sitcom- How I met your Mother. I am a long time "Friends" fan, and this is the updated modern version of friends! We just recently discovered this show and we are addicted.

Shirt w/ Rosettes

I have been so busy these last few days with family, SHOPPING and trying to catch up on sleep! I did this about a week ago, and finally am finding a chance to post it!
Just another idea of what a few little rosettes and a diamond can do for a shirt!

The Rice Crispy Turkey

My husband has been saying for about a week or so that he was going to make a giant turkey out of rice crispy treats. When he said giant turkey, I thought a flat turkey, but apparently he meant a turkey that was standing on two feet. Here is my husband's creation!

Shortly after this picture the turkey's head fell off... I guess a huge turkey seemed like a good idea at the time, but sadly he didn't make it.

Friday, November 26, 2010

Day 3 and 4

Day 3- My favorite movie. The Hangover. Yes. The Hangover. I know it is not everybody's taste, but I LOVE that movie. We watched it for the first time on our way to Vegas, so that made it all the better

Day 4- A picture of me as a child
I was 4 years old in this picture, and I broke my leg jumping of the swing set. My brother told me to, so I thought it was okay... Then, my dad didn't believe me that it hurt, so he made me try and stand up which probably caused a larger fracture in my leg. They finally believed me and took me to the hospital!

Wednesday, November 24, 2010

Day 2

Day 2 is my favorite song........ This one is tough. It is probably To Make you Feel my Love by Garth Brooks. My husband has a fantastic voice and has sang this to me several times and it is so sweet....

Tuesday, November 23, 2010

I love my bread machine

Recently I discovered the wonders of a bread machine. I had never used one, and my Grandma happened to have a spare, so she gave it to me! Now I LOVE making bread, pizza dough, whatever. I love how you just throw all the ingredients in, and it does all the work. That's my kind of machine. Here is some cinnamon raisin bread I made that I am going to make a bread pudding with for thanksgiving.
Here is the recipe. It calls for bread flower, but I used all purpose flower and it turned out fine!

Ingredients


1 cup milk, room temperature

3 tablespoons butter, softened

3 tablespoons honey

1 tablespoon brown sugar

1 egg, room temperature

1 teaspoon salt

1 teaspoon ground cinnamon

3 cups bread flour

2 1/4 teaspoons bread machine yeast

1 cup raisins

Directions

1.Add all ingredients, except raisins, in the order given above, or as directed in your bread machine manual. Set the bread maker on Sweet Dough setting.

2.Add the raisins at the signal, or about 5 minutes before the kneading cycle has finished.

I found this delicious recipe at All Recipes


Day 1

The first thing is a recent photo of me....... I have searched and searched and apparently I am the one always behind the camera! This is about a month ago at my friend Megan's baby shower.
Since this Meg had her perfect little boy. I am SO happy for her and her husband.

30 day challenge... Thought it might be fun!

all about me


Ever wonder who your blogger friends really are?  Wonder no more!  We've put our own spin on the "All About Me in 30 Days" blogging memes floating around to share a little bit of ourselves with our friends. 

This 30 day challenge begins today and ends on December 24th.... if you miss a few days, just play catch up!  No pressure :)  Be sure to grab the button so we know you are participating - post it anywhere on your blog or in each daily post!  Be sure to link up below and join in on the fun!


Day 1 – a recent photo of you

Day 2 – your favorite song

Day 3 – your favorite movie

Day 4 – a photo of you as a child

Day 5 – your favorite television program

Day 6 – your favorite book

Day 7 – a picture of you and the person you have been closest with the longest

Day 8 – your favorite quote

Day 9 – your dream house (description or photo!)

Day 10 – a photo that makes you happy

Day 11 – a photo that makes you angry/sad

Day 12 – something you are OCD about

Day 13 – a description of what's currently in your handbag/purse/diaper bag!

Day 14 – a photo of a person you’d love to trade places with for a day

Day 15 – a photo of yourself and a new friend you met this year

Day 16 – a song that makes you cry

Day 17 – your favorite website

Day 18 – a photo of your favorite memory

Day 19 – a picture of somewhere you’d like to travel

Day 20 – a talent of yours

Day 21 – a hobby of yours

Day 22 – a photo of your wedding/future wedding plans

Day 23 – a photo of something that has made a huge impact on your life recently

Day 24 – a recipe

Day 25 – your worst habit

Day 26 – a photo of where you live

Day 27 – a photo of someone you could never imagine your life without

Day 28 – your hopes, dreams, plans for the next 365 days

Day 29 – a picture of something you want to do before you die

Day 30 – it's Christmas Eve! post a photo of what's under your tree this year!


You can Join this at Marine Parents. We'll see if I actually do this! :)

Sunday, November 21, 2010

Almost 100 followers!!!!!!

I have almost 100 followers! WOW! Thank you all! My goal was 100 by January so I have beat that by a long shot, I hope! I don't really know much about giveaways.... but if anyone has any ideas let me know! Hopefully I will know more about giveaways by 200 followers. Thank you! Thank you! Thank yoU!

Plain Shirt into Cardigan Tutorial

I have been dead to the world for a few days because I have been re-reading the last harry potter! Yes, I am a nerd, but we had to get ready for the new movie. SO. I finished the book and now have time to craft. I got a plain long sleeve boat neck shirt at old navy on clearance for $2.50. I thought for that price, I could come up with something to do with it. I decided to turn it into a cardigan. Here is what I did.
First I started with my plain t.

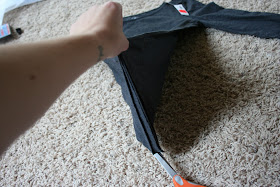
I folded the front in half so I knew where the middle would be and made a cut with my scissors

Here is what it looks like cut up the front

Then I found this great pre-ruffled trim stuff at jo-anns, so I decided that would be fun to add to one side. On the other side I just cut up a black t-shirt and made it be like bias tape and sewed it all the way on the other side.

Final Product! It's a fun little shirt. You could add any embellishments you wanted really. Just another fun idea of what to do with an old or cheap t.

Chocolate Chip Cupcakes with Chocolate Ganache

Since I am on my cupcakes kick, I got this recipe from my friend Sam. The only problem I found with the recipe, is that they don't come out as dome cupcakes, they are kind of concave... I like dome cupcakes. The concaveness of them makes a good spot for the chocoloate mousse and ganache to sit, but I would have rather had my dome cupcakes! I did half the cupcakes with the chocolate mousse in the center, and the others with just the ganache. Here is the recipe!
Makes 16 regular cupcakes.


•1/2 cup (1 stick) butter, room temperature

•1-1/4 cups sugar

•2 large eggs, room temperature

•3/4 cup flour

•1/2 teaspoon baking powder

•1/4 teaspoon baking soda

•1/4 teaspoon salt

•1/2 cup unsweetened cocoa powder

•1/2 cup milk

•1 teaspoons vanilla

•2/3 cup mini semi-sweet chocolate chips

1.Beat butter until softened.

2.Add sugar and beat until light and fluffy, about 3 minutes.

3.Add eggs, one at a time, beating until well combined.

4.Measure the flour, baking powder, baking soda, salt, and cocoa powder into a small sized bowl and whisk to combine.

5.Measure out the milk and vanilla and stir to combine.

6.Add about a third of the dry ingredients to the butter/sugar and beat to combine. Add about a half of the milk/vanilla and beat to combine.

7.Continue adding, alternating between dry and wet and finishing with the dry.

8.Stir in chocolate chips.

9.Scoop batter into cupcake cups about 1/2 full.

10.Bake at 350 degrees for 22-25 minutes or until a cake tester comes out clean.

 
Chocolate Mousse
•8 raw eggs, separated (If you are concerned about egg safety, read my post on eggs. I used pasteurized eggs.)


•8 oz. bittersweet chocolate (I used Scharffen Berger)

•1 Tbsp. brandy

•3 Tbsp. coffee (I was too lazy to make coffee so I used 2 t of coffee extract instead.)

Beat the egg yolks until they are yellow. Place the broken-up chocolate in a small oven-proof dish; pour the hot coffee over the chocolate and put it in a hot oven and let the chocolate melt until it almost gets thick. Take it out of the oven and mix with a beater or wire whisk, adding the egg yolks. After they are incorporated, add the brandy. Whip the egg whites until they are foamy and hold soft peaks. Take two Tbsp. of egg whites and add the chocolate, then fold in the rest of the egg whites carefully. Pour the mixture into a glass bowl or individual serving dishes, and chill in the refrigerator for a few hours; the mousse will thicken up as it chills.

Chocolate Ganache
•3.5 oz of dark chocolate broken into small pieces (I used Patric chocolate)


•1/3 C heavy cream

Place the chocolate in a small glass bowl. Heat the cream in a small saucepan until it just starts to boil. Pour the cream over the chocolate and stir until all the chocolate is melted and integrated with the cream. While it is still warm, spread a thin layer of it over the cupcakes. It will harden when it cools

This recipe is from the Cupcake Project


Wednesday, November 17, 2010

$10 dresser makeover!

Wow! I am excited. My dresser turned out SO much better than I thought it would! Here is the before pic again.
The top of the dresser was warped, and that's why the lady I got it from said she was about to throw it in the trash! AH! My hand husband was able to clamp the top down and re-nail it back down. There is a little crack at the top from doing this, bu nothing that you can notice or that hurts it!

TADA! I painted it RED! and I mod podged sheet music to the drawers.


I am super happy with it, and am now trying to decide where to put it! It is a LOUD piece. I am so excited my vision actually came through!

Tuesday, November 16, 2010

Cheap PHOTO BOOKS and HOLIDAY CARDS!

I LOVE picaboo photo books. It is so fun because you download the program, and get to customize it all yourself. It is much better than the other ones I have tried. I have already made 4 photo books for various family members! Here is an example of one of the books I made... bad pictures sorry.


They are super cheap when you use a coupon code like these! Just click on the picture and GET STARTED!
Picaboo Promotional BannerPicaboo Promotional Banner

Blog AWARD


A big THANK YOU to Erica at "b" is for Boy for passing on the Stylish Blogger Award to me!
Rules for accepting this award are:

1. Thank & link back to the person who awarded you this.

2. Share 7 things about yourself.

3. Pay it forward to 7 recently discovered great bloggers.

4. Contact those bloggers and tell them about their award.


                                                                     7 things about me...
1. I love Jesus with all my heart.
2. I have three tattoos... so far!
3. I LOVE to eat. Thankfully I was blessed with good genes and shockingly remain skinny
4. My life long dream was to go to the price is right, and I did when I was 18. We got on stage at the end with Bob because a fantastic lady we met at the show won the entire showcase! She claimed my two friends and I were her "daughters" so we could get on stage! 
5. Somdeday I will find a way to help other people through the story of my mom's cancer, and her life.
6. The first time I my mom met my husband she knew I was going to marry him because he fit the exact description I always described as a kid. Bigger guy that is funny.
7. My son is an incredible blessing from God. I love him SOOOO much and he is more perfect a child than I could have ever hoped or wished for.

7 blogs


Monday, November 15, 2010

Gorgonzola Stuffed Chicken Breasts Wrapped in Bacon

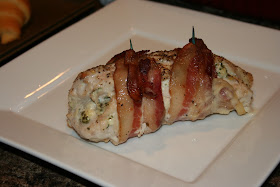
Tonight the real chef decided to cook gourmet. While I went to a craft party on saturday, Gabe and Thomas went grocery shopping for the gourmet meals he has planned this week. The only problem is that when shopping alone, there is no nagging, I mean voice, telling him what is too expensive and what is okay to buy......... My little coupon heart was a little sad to hear how much he spent for so little. BUT! He was being sweet and wanted to cook some delicious meals, so it's all good. Here is our gourmet meal we had tonight. He got the recipe from allrecipes.com
Ingredients

2 skinless, boneless chicken breast halves

1/4 cup crumbled Gorgonzola cheese

2 tablespoons minced fresh parsley

2 tablespoons minced shallot

1 clove garlic, minced

4 thick slices of applewood smoked bacon

salt and ground black pepper to taste

Directions

1.Preheat oven to 375 degrees F (190 degrees C). Spray an 8x8-inch baking dish with cooking spray.

2.Using a sharp knife, cut a slit into the thick side of each chicken breast about 2 inches long and 1 1/2 inches deep.

3.Mash together the Gorgonzola cheese, parsley, shallot, and garlic in a small bowl; season with salt and black pepper. Divide the filling in half, and stuff each chicken breast with cheese filling. Wrap 2 slices of bacon around each breast, and secure with wooden toothpicks. Place the chicken breasts into the prepared baking dish.

4.Bake in the preheated oven until the bacon is browned and the chicken is no longer pink inside, about 35 minutes. An instant-read thermometer inserted into the center of a breast should read about 165 degrees F (75 degrees C).

 
My husband is the master of chicken. Somehow it is always perfectly cooked, tender and still moist. My chicken always turns out dry and over cooked! We would suggest leaving out the shallots completely, or sauteing them before you put them in the chicken. They were a bit strong and took away from the amazing cheese. We are such foodies. We sat there and discussed what was good about the meal and what could be changed for about 10 minutes as we were eating! More cooking from Chef Gabe to come!

Sunday, November 14, 2010

A simple can of Paint can do wonders!

My grandma is one of the sweetest ladies I know. She always picks up random fun stuff for me at yard sales that she thinks I would like. I told her I was looking for a canister to hold some of my cooking utensils, so this is what she found me.
Not exactly my style... So, nothing a simple can of paint can't fix.

Tada! I just spray painted it with some red paint, and it came out beautiful. I still might put some sort of vinyl decal on it, but for now it works. So. If you see something that is hideous and you don't think will work, consider painting it!

Friday, November 12, 2010

Coconut Raspberry Cupcakes with Cream Cheese Frosting!

As said earlier, I am addicted to making cupcakes! My friend is having a craft party tomorrow, so I thought it would be a perfect time to try out a recipe from a cupcake book my man got me. Here are the cupcakes and the recipe!

Raspberry Coconut Cake
1 stick butter, softened
1 cup sugar
3 eggs
1/2 cup all-purpose flour
1/4 cup self rising flour (very important. I tried to not use this)
1/2 cup unsweetened shredded coconut
1/3 cup sour cream
5 ounces frozen raspberries

Cream Cheese Frosting
5 tablespoons butter, softened
12 ounces cream cheese, softened
2 teaspoons coconut extract (I used vanilla)
3 cups powdered sugar

Decorations
1 cup flaked coconut, toasted
fresh raspberries

DIRECTIONS
1. Preheat oven to 350 degrees
2. Beat butter, sugar and eggs in small bowl with electric mixer until light and fluffy
3. Stir in sifted flours, coconut, sour cream and frozen raspberries. Divide mixture among baking cups
4. Bake about 30-35 minutes
5. Make cream cheese frosting
6. Decorate


A little messy to make, but very fun. Make sure you use the self rising flour. I tried to just use regular flour and add baking soda... did not work. Mine are a little deflated in the center, but I just built it up with frosting. Enjoy!

Thursday, November 11, 2010

DIY Fleece Slipper Boots

I found this amazing gift idea at Black and White. She does have a pattern for sale to make these boots, but I decided I woul just try and wing it. My trial boots came out pretty good, but I know what to fix with the next boots! There are going to be SEVERAL family members and friends getting these for christmas! Each boot with the lining and outer takes about 1 yard of fabric. If you want the lining to be a different color like mine, use a half yard of one color and a half yard of another. Then you can dress them up however you want.


If you look closely mine are a bit uneven. Oh well. If you want to buy the pattern for these so yours can be PERFECT. Go to Black and White and buy her pattern!
cross my hooks blog link

Wednesday, November 10, 2010

Another Ruffle Shirt.... I'm addicted

Did I mention I am addicted to doing shirt re-fashions? Well. I am. Here is another attempt at the ruffle shirt. I don't like this one as much because the shirt was a different material and too stretchy!
Check out my other ruffle shirt to find a site for a tutorial!