Tabs

Wednesday, August 31, 2011

Flourless Chocolate Torte w. Chocolate ganache

I LOVE to bake, but I don't have a big sweet tooth. Last night we were having some of our good friends over, and so I decided I wanted to try out a chocolate torte. I watch Top Chef Just Desserts, and they make these ALL THE TIME! So, I thought I would try this "high end" creation. It turned out BEAUTIFUL! Not to toot my own horn, but I swear it was restaurant quality! I was so stinking proud of it! But, it is extremely rich. I could only have a few bites, and only one of the four of us actually finished our piece. So this is a great dessert in small doses, or for a fancy party. Here it is, and the recipe!

 Torte Pre Ganache
 Make sure and put it on a wire rack when pouring the ganache!

I wouldn't recommend these big of slices! haha

Flourless Chocolate Torte
Ingredients
Directions
Preheat oven to 325 degrees F.
Using 1/2 tablespoon butter grease a 9-inch springform pan and line bottom with a parchment round. Cover pan underneath and along sides with foil and set in a roasting pan. Bring a medium saucepan of water to boil.
Combine the chocolate, butter, and amaretto in a metal bowl set over simmering water or in the top of a double boiler. Melt the mixture, stirring constantly, until smooth and creamy, about 5 minutes; reserve.
Meanwhile combine eggs, sugar, vanilla, and salt in a large bowl and beat with an electric mixer until frothy and almost doubled in volume, about 5 to 10 minutes. Fold 1/3 of egg mixture into chocolate mixture using a rubber spatula. Repeat this process 2 more times - until all of egg mixture has been folded into chocolate mixture.
Pour batter into prepared springform pan and place in the roasting pan. Pour enough boiling water into the roasting pan to come about halfway up the sides. Bake until cake has risen slightly and edges are just beginning to set, about 40 to 45 minutes. Remove cake from roasting pan and cool on wire rack to room temperature. Remove foil, cover, and refrigerate overnight.
Remove cake from refrigerator about 30 minutes before serving. Remove springform pan sides, invert cake onto a large plate, and peel away the parchment paper from bottom. Reinvert cake on another large plate or serving platter and garnish with confectioners' sugar or cocoa powder immediately before serving.

Chocolate Ganache
Ingredients:
1 cup semi sweet chocolate chips
2/3 cup heavy cream

Directions

  1. In a heavy saucepan, melt chocolate chips with cream over low heat. Remove from the heat. Refrigerate, stirring occasionally.
  2. For a pourable ganache, cool until mixture reaches 85 degrees F-90 degrees F and is slightly thickened, about 40 minutes. Pour over cake, allowing some to flow down the edges to completely coat. Spread ganache with a spatula if necessary to evenly coat, working quickly before it thickens. Chill until set.
  3. For spreadable ganache, chill until mixture reaches a spreadable consistency. Spread over cake. Chill until set.
  

Thursday, August 25, 2011

Remembering Mom.


Five years ago today, a beautiful woman left her earthly home, and went to be with Jesus in heaven. My mom was only 46, and I was 18 when she died. She had struggled with a short 10 month battle with lymphoma. My mom was really one of the most wonderful people you could have ever known. She was a strong Godly woman, and I hope I can someday be more like her. She taught me the most important thing in life, how to be a wonderful Mother. I am sad my children will never get to know her, but thankful one day we will all be in heaven together. Love you mom. Miss you more than ever. 

Here is a video I did for her funeral highlighting her incredible life. 

Monday, August 22, 2011

Zipper Shirt

I think I have been watching too much Project Runway. I have always loved the edgier looks where they add fun zipper details. I was watching some past seasons, and a lot of them did the exposed zipper in either the back of the outfit, or on the front. SO. I think that is where I came up with this! 

Materials:
1. Old or Cheapo Shirt. (mine was a $5 shirt from Kohls)
2. 5-7 inch zipper, depending on the look. Mine was a 7"
3. Sewing machine or needle and thread

 First, lay out your shirt and lay the zipper on top of where you want it to go. Then, while unzipping the zipper, cut down in between the zipper on the shirt.
 It should be open and look like this. Next, sew the zipper to the TOP of the shirt. I didn't do any right side to right side, I just sewed right onto the shirt. I unzipped as I went to make sure it was all lining up correctly.
 DONE! How easy is that? You can unzip it a little, leave it totally zipped, or whatever!

I am so in love and obsessed with how this turned out! I bought another zipper, so expect another zipper project!


Sunday, August 21, 2011

Overall Shirt NO SEW

I am an avid watcher/gross obsession  of America's Next Top Model. If any of you have watched it over the years, I have always been in love with a shirt, winner Eva wore during her confessionals. It was a blackish tank top and one strap was an overall! I looked EVERYWHERE for a shirt like this, but after about 5 years of looking, I decided to make my own! This process is super easy, and actually requires NO SEWING! Here are the steps. 

OVERALL SHIRT!

 First, I started with a package of overall clips, and then a long sleeve shirt. A tank top, short sleeve or any sleeve shirt will work. Ignore the other stuff! Projects to come!
 Next, since I used a long sleeve shirt, I cut off the sleeves
 Then on one of the sleeves left, I cut it in half a little above where the neckline is. Then following the directions on the overall packet, nail in the button.
 Next I attached the clip portion. BEFORE you glue it down, try it on to make sure that you have pulled enough of the shirt through and that it fits right. From there I used liquid stitch to glue it into place around the buckle.
 My finished shirt!
 Excuse my son's potty in the background.. I am not the best at self portraits! The husband was napping with baby.
Horray! The shirt I have wanted for 5 years is finally mine! This would be really fun in other colors too! Have fun, and message me if you do this yourself!

Monday, August 15, 2011

Play Cupboard MAKEOVER

My husband's Grandma gave me this really really cute old kid's play cupboard about a month ago. It has been sitting in the garage waiting for me to do something with it. I could not decide what color I wanted to paint it, but yesterday I decided to paint it BLUE with chalkboard paint on the cupboards and counter top. I also found some really adorable pull knobs at Hobby Lobby. Here is the before and after shots!


I love it! It is a little darker than I expected with the chalkboard paint, but I think she will love it when she gets a bit older. I like that it is a neutral color in case my son decides to play with it too!

Sunday, August 7, 2011

Latest Dresser Makeover

I found this dresser on craige's list. Sadly I forgot to take a before picture! Basically it was a gross color of yellow and kind of chipping away. I did a plain satin black paint, and then heirloom white for my stencil. I LOVE how it turned out. It's also for sale!

Wednesday, August 3, 2011

Texas Roadhouse Copy Rolls and Butter!

I LOVE Texas Roadhouse. I usually eat 2 baskets of rolls and butter all by myself when we go, so I was searching around and found a recipe for the rolls on Envy My Cooking! The recipe is fairly simple, and doesn't take a ton of time. Here it is:

Texas Roadhouse Rolls - Copycat Recipe
adapted from: Good Stuff Maynard

4 tsp. active dry yeast
1/2 c. warm water
2 c. milk, scalded and cooled to lukewarm
3 Tbl. of melted butter, slightly cooled
1/2 c. sugar
2 quarts all purpose flour (7-8 cups)
2 whole eggs
2 tsp. salt

Dissolve yeast in warm water with a teaspoon of sugar. Add yeast, milk, sugar and enough flour to make a medium batter. Beat thoroughly. Let stand until light and foamy. Add melted butter, eggs and salt. Beat well.

Add enough flour to form a soft dough. Sprinkle a small amount of flour onto counter and let dough rest. Meanwhile, grease a large bowl. Knead dough until smooth and satiny (or put in your kitchen-aid, use the dough hook and knead for about five minutes.)and put in greased bowl; turn over to grease top.Cover and let rise in a warm place until double in bulk. Punch down. Turn out onto a floured board. Divide into portions for shaping; let rest 10 minutes. Shape dough into desired forms. Place on greased baking sheets. Let rise until doubled.

Bake at 350 degrees for 10-15 minutes or until golden brown. Baste immediately with butter. Yield: 5 to 6 dozen.
************************************************************** 
 
Simple Enough??? So, you can't have the rolls without the butter, so I went searching for the butter recipe, and it is SOOOO easy I was shocked. I got this recipe from Food.com 
 Texas Roadhouse Butter

Directions:

  1. In a small bowl, with a handmixer, beat butter till fluffy.
  2. Add confectioner's sugar at a time, blending well.
  3. Add cinnamon to mixture and blend well.

Read more: http://www.food.com/recipe/texas-roadhouse-copycat-cinnamon-butter-447228#ixzz1U1WG2sSQ
 
ENJOY!!! 

Tuesday, August 2, 2011

Mini Vacation!

This weekend, we took a mini vacation to lagoon! We took my brother and his girlfriend with us so that we would be able to ride some rides while they watched the kids. Our trail blazer only fits three adults after the two car seats, so we decided to take my dad's car that had a bench seat in front. it was a TIGHT fit! On our way there, we weren't really paying attention to the gas gauge and realized we were getting super low!!! We were frantically looking for a gas station, because we were literally in the middle of nowhere. We finally saw a Sinclair station in the distance, and pulled off. The little convenience store attached to the gas station was called "Welcome to the Middle of Nowhere" Huh. So. We go in, get a drink, come out and my husband tells me.... the car won't start! I am not freaking out yet, so I told him, let's just get someone to jump us... we tried. Did not work. SO. I called a tow truck. Gabe and Thomas left in the tow truck, (probably the highlight of my son's trip was riding in the tow truck) My brother, his girlfriend, Mia and I waited at the gas station for................. 5 HOURS! My dad met Gabe and switched him cars. Turned out the starter in my dad's car was broken, but they had it fixed before he even got there. We arrived in Salt Lake about 6 hours later than scheduled, but everyone was in good spirits! We had a BLAST at lagoon!!!


One Sleevish Shirt Refashion

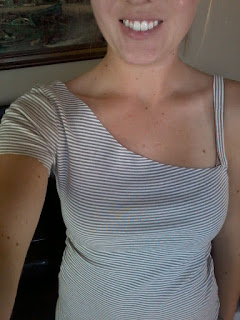
I have had this idea forever to make a long sleeve or tee or whatever into just a one sleeve, but with one of the actual capped sleeves still intact. This is from a previous refashion that I wasn't crazy about. The cinched sleeve tutorial. Basically all I did was cut at a diagonal from right under the hem for the top of the shirt, the neck part, cannot think of the real name for it! So, cut at a diagonal until just below the second arm.  I loved the look of just the one sleeve, but I absolutely hate wearing a strapless bra, so I added the little strap, and I don't think it looks so bad!
BEFORE
 AFTER


I just sewed the little strap on sewing right side to right side. I had the shirt on first, and then pinned where I wanted the strap to go. I did this for the front, but forgot to for the back, so it is a little off in the back. oh well! Fun and easy! Took me about 5 minutes!